This page describes how to setup Eclipse, and run Zong! and its automated tests. Please follow the steps carefully.
Setup Eclipse
Before Zong! can be imported into Eclipse, please make sure the following requirements are met.
- Install Eclipse 4.3 (Kepler) or later. The main development is currently done in Eclipse 4.3.2.
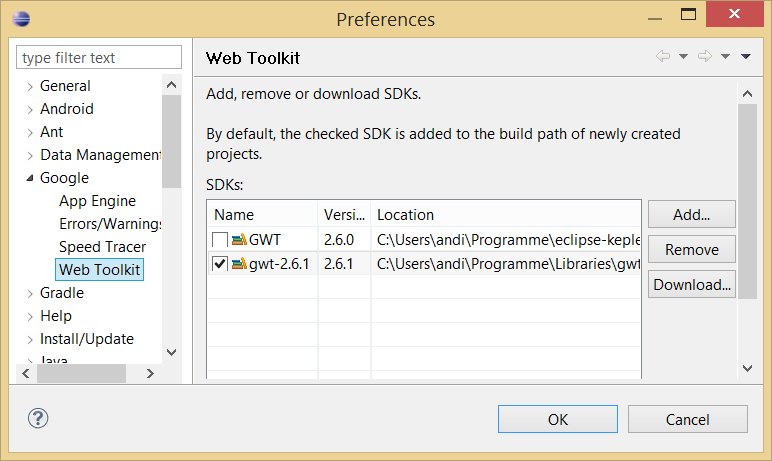
- Install GWT 2.6.1 (important!), including the GWT Eclipse plugin. This is necessary for the gwt-utils and webapp modules, which provide HTML5/JS code generated from Java code. Make sure 2.6.1 is installed and selected:
If you are not interested in the HTML5/JS projects, you can also skip this step and close them in your Eclipse workspace later.
Setup the workspace
After Zong! was downloaded, it can be opened in the Eclipse IDE. This section describes the steps for getting Zong! up and running.
- Create and open a workspace for Zong!
Start Eclipse. Select the root folder of your local Zong! repository as the workspace.
- Provide the Java Development Kits
Currently, Zong! requires two JDKs in the workspace. A JDK 6 or 7 must be set as the default JDK, and there must also be a JDK 8. Java 6 is required for the Android and GWT projects, but although JDK 8 can compile with compatibility to Java 6, there seem to be problems in some versions of Eclipse (maybe a bug which will disappear in later versions). See the following screenshot how it should look like for the moment: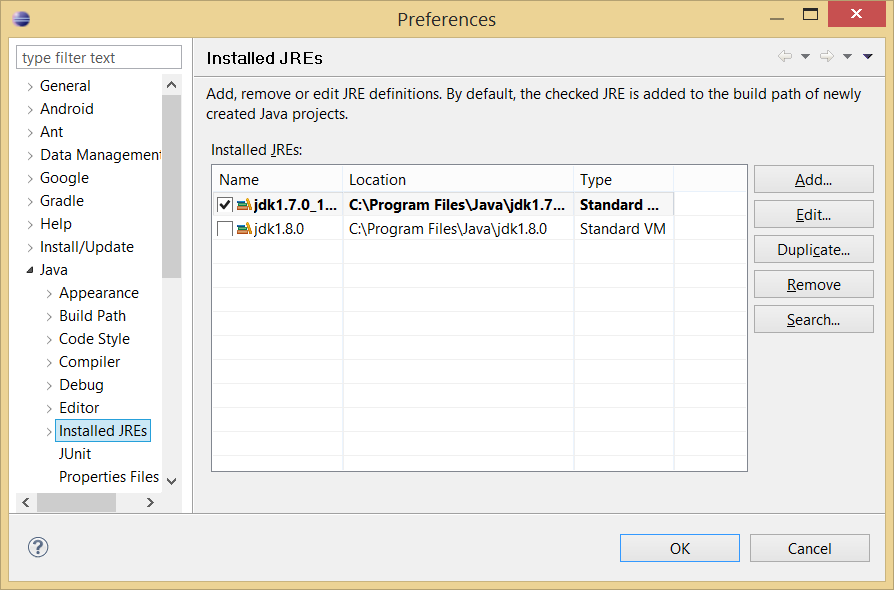
Import the projects
Zong! consists of many subprojects, called modules. These have to be imported once.
Choose "File → Import...". In the following dialog, select "General → Existing Projects into Workspace" and click on "Next >". '
'
In the next dialog, click on "Browse..." and select the root folder of your local Zong! repository. A lot of projects appear, which are selected by default. Click on "Finish".
After that, all projects appear in the Package Explorer of Eclipse.
Important: Currently, the project "androidviewer" does not compile. Please right-click the project and select "Close Project". Within the next sprints, the project will be fixed and this notice will be removed from this page.
Download or update the external libraries
As you will notice, Zong! is still not ready for compiling. A lot of errors appear in the Problems view of Eclipse. We need to download some external libraries, which are not part of the git repository (since we do not want to store large binary files there, to keep the repository small). Downloading or updating the libraries is easy: Just right click the Ant script filelib.update.xmlin thelibproject, then select "Run As → Ant Build". All required libraries will be downloaded.Each time when you update (pull) your local repository, and when you get classpath errors when compiling, repeat this step and the later step "Import user libraries". Probably the libraries were changed or updated to newer versions.
Notice that this step is not needed for building Zong! using the gradle build script. Gradle will download and update the needed libraries automatically.

Zong! is still not compiling successfully, but the following steps will solve the remaining problems.
- Install Lombok in Eclipse
Lombok is a library, which allows to write much more concise Java code, e.g. by auto-generating getters and constructors, by extending the compiler. Lombok is shipped with Zong!. You can find it inlib/lombok-<version>.jar(after you followed the previous step ).
).
First, close Eclipse. Then double-click the file to run it (or runjava -jar lombok-<version>.jarin thelibdirectory) to launch its installer. In the dialog, select your Eclipse executable and click "Install / Update". After installing, restart Eclipse and open your Zong! workspace again.
Import user libraries
At this point we have downloaded the required libraries, but Eclipse does not know them yet. We have to import the so-called "user libraries".
In "Window → Preferences", select "Java → Build Path → User Libraries". The following dialog appears:
Click on "Import..." and select the filelib/lib.userlibrariesin thelibfolder of your local repository. Import all libraries (maybe more than in the following screenshot).
- Compile for Java 6
In "Window → Preferences", select "Java → Compiler" and select "1.6" for the "Compiler compliance level". This constraint is needed for Android support.
Some of the projects require Java 8, but this is specified in the projects and requires no interaction by the developer. It is just required that JDK 8 is installed and known to Eclipse. - Apply recommended settings
There are some important settings, which must or should be changed.
All text files (including Java sources) are encoded in UTF-8. In "Window → Preferences", select "General → Workspace". At the bottom, select "UTF-8" for "Text file encoding" (in Linux, this is already the default value).
Other settings we recommend to change:a) In "Java → Compiler → Errors/Warnings", set "Forbidden reference (access rules)" to warning. Currently, we use internal JavaSE API, so Eclipse may report an error otherwise.
b) In "Java → Compiler → Errors/Warnings", set "Serializable class without serialVersionUID" to "Ignore". We do not use serialization, and this step will remove a lot of unfounded warnings.
c) In the same window, change "Missing '@Override' annotation" to "Warning" and select the checkbox "Include implementations of interface methods (1.6 or higher)". - Import Java formatting style
Java allows different formatting styles. We use a compact format, for example with opening braces at the same line. To let Eclipse know about our formatting style, we have to import it. In "Window -> Preferences", under "Java -> Code Style -> Formatter", click "Import..." and select the fileutils/material/Eclipse Java Formatter.xml.
That's it. Zong! should be compiling now
If you have problems, please let us know, so that we can help you and update this guide.
Run Zong! in Eclipse
Currently, there is no runnable component of Zong! in the repository. If the first one is online, we will update this section.
Run automated tests in Eclipse
Zong! and the Xenoage Utils project contain a lot of unit tests. To run them, simply right click on a project and select "Run As → JUnit Test".